After we got married (!) last month Melissa and I spent 10 days in Europe on our honeymoon. London, Paris, and Rome! It was an amazing trip, especially since neither of us had been to Europe at all before. But this post isn’t going to be our amazing trip’s slideshow. On the more technical side of things, I was fascinated at the idea of using our smartphones (we both have a Motorola Droid on Verizon) in Europe.
A little background: not all US cell phones work in Europe. I’ll avoid the nitpicky details and just say that in general AT&T or T-Mobile phones will work in Europe, but Verizon and other carriers won’t. While we could still open and use apps on our phones, anything that required a cell network connection would be dead.
This distressed my inner techie – I’ve become hopelessly addicted to navigating with my phone’s google maps, and google maps pulls the maps over a cell connection. I really wanted to use it to find our way around. The one thing that still worked on the Droid in Europe is the GPS – it can get your position in latitude/longitude. But with no data connection It has no maps to plot that point on! All that Google Maps would show me is a blue dot on a grey background. Not exactly handy for finding my way.
But with a little foresight and pre-planning, I set up my Droid to cache the maps locally before we left for Europe. This process was a bit of a pain, because it’s not well documented anywhere that I could find. Here’s a tutorial:
Install RMaps on your Android phone. RMaps is a free android app which has the capability to read maps from a file instead of loading them over the web.
Next, we generate the maps to store. This is done on a PC, with a program called Mobile Atlas Creator. There’s tons of different versions of this program scattered over the web. It took me a while to track down one configured for what I needed. Here it is. Download and unzip the file called “Mobile_Atlas_Creator_1.7_SQLite.zip”. Open Mobile Atlas Creator.
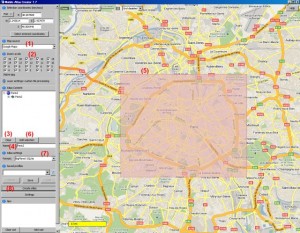
Now, set the options for your map. I’ve annotated a screenshot with numbers pointing out where all these settings are. Click it for a bigger version.
- Pick a map source from the drop-down (1). I used Google Maps.
- Check off the zoom levels you want your map to have (2). 19 is the most zoomed in, and 0 is the most zoomed out. The more zoom levels you include, the larger a file size your map will be. 19 and 18 in particular are gigantic. I included all 20 in my map of Paris, which for an area this size results in about a 205mb map.
- Click the Clear button (3).
- Give your map a name in the Name box (4).
- In the big window on the right, click and drag a box around the area you want your map to include (5). Obviously, the more area you include the larger the resulting file will be.
- Click the Add Selection button (6).
- From the Format dropdown (7), pick BigPlanet SQLite.
- Click Create Atlas (8).
Now the map will be downloaded and packaged for reading by RMaps. Depending on your web connection, this process can take a very long time. So walk away and get a snack or something. I made a map for each of the 3 cities we visited, and my maps ranged from 80mb to 220mb.
If all’s gone well, now you have a map file! Connect your phone to the computer via USB, and browse to the phone’s rmaps/maps folder. Put your map file there.
Disconnect your phone. Open RMaps. Press the Menu button and pick Maps. Now you should see the map you made as an option. Pick it, and you’ll see your map! This map will work anywhere, with or without a cell connection! And with GPS enabled, it’ll even show where you are on the map.
RMaps has one major limitation: Maps aren’t searchable. You can’t get point to point directions. But it was still far far better than nothing, and a quick ‘where are we’ check saved us from being lost a handful of times. Definitely worth the advance time to set up!
